Contents
Introduction to Capcut and Its Green Screen Feature
Capcut has emerged as a go-to video editing application for Android users, renowned for its user-friendly interface and robust feature set. This app, developed by Bytedance, the same company behind TikTok, has gained immense popularity among content creators for its versatility and ease of use. One of its most compelling features is the green screen effect, a tool that allows users to superimpose themselves or other subjects onto different backgrounds or scenes. This technique, widely used in professional filmmaking, is now accessible to everyone through Capcut. By offering such advanced capabilities, Capcut enables users to elevate their video content, fostering creativity and experimentation. Whether you’re a budding filmmaker, a social media influencer, or simply someone who loves creating videos, the green screen feature in Capcut opens up a world of creative possibilities right at your fingertips.
The Basics of Green Screen Technology
- Definition of Green Screen: At its core, a green screen is a backdrop of a uniformly green color used in video production. This backdrop is typically made of fabric, paper, or paint, and its unique, vibrant green hue is chosen for its rarity in natural human skin tones and clothing, making it easier to separate from the subject being filmed.
- Chroma Keying: The process used in conjunction with green screens is known as chroma keying. This technique involves shooting a subject against the green backdrop and then replacing the green color with another video or image in post-production. Chroma keying is a pivotal technique in video editing that allows for the seamless integration of different elements.
- Applications in Video Editing: Green screens are extensively used in various types of video productions, from news broadcasts and weather reports to feature films and YouTube content. By allowing editors to superimpose subjects into any setting, green screens enhance storytelling and provide endless creative opportunities.
- Advantages for Content Creators: For content creators, the green screen technology offers a cost-effective and flexible solution to create visually stunning and diverse content. It eliminates the need for expensive sets or on-location shoots, thus opening up the realms of imagination and creativity regardless of budget constraints.
Step-by-Step Guide: Using Green Screen on Capcut
- Download and Install Capcut: Begin by ensuring you have the latest version of Capcut installed on your Android device. You can find it on the Google Play Store.
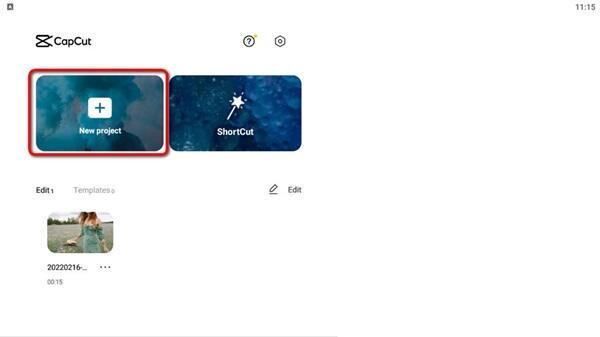
- Start a New Project: Open Capcut and tap on ‘New Project’. Select the footage you wish to edit or record a new video directly through the app.
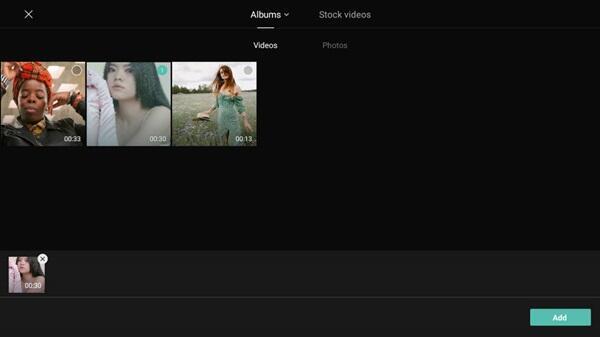
- Import Your Green Screen Footage: If you’ve already recorded a video using a green screen, import it into your project. Ensure the green screen is evenly lit and the subject is clearly distinguishable from the background.
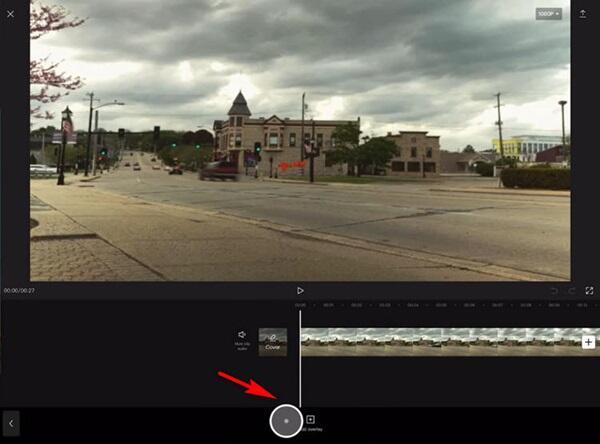
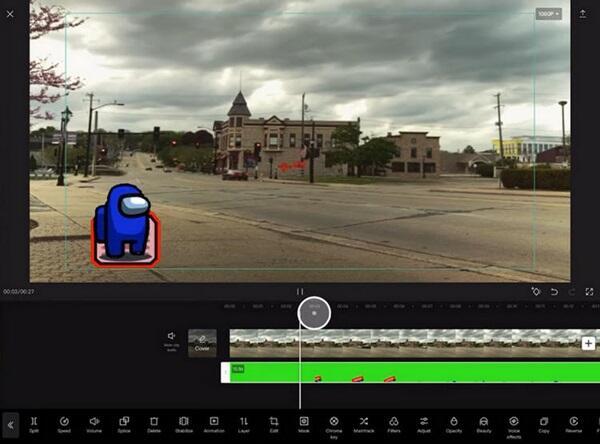
- Access the Green Screen Tool: In the editing interface, tap on the ‘Effects’ tab and find the ‘Chroma Key’ option. This is your primary tool for applying the green screen effect.
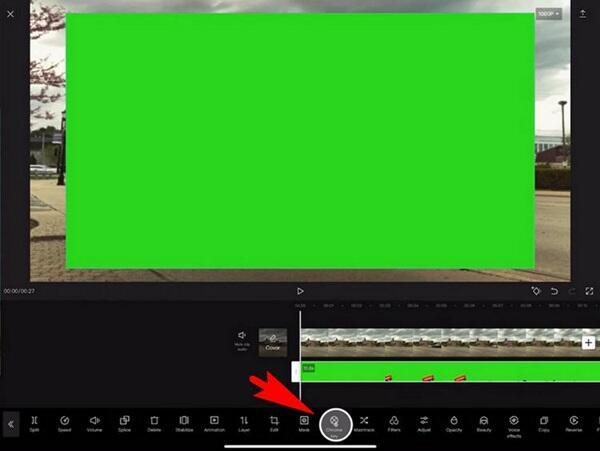
- Apply Chroma Key Effect: Select your green screen footage on the timeline and apply the Chroma Key effect. Capcut will automatically detect the green color and make it transparent.
- Adjust the Settings: Fine-tune the effect using the adjustment settings. You can tweak the intensity and edges of the Chroma Key effect to ensure a seamless blend between your subject and the new background.
- Add a New Background: Now that your original green background is transparent, add a new background. You can choose from Capcut’s library or import your own image or video.
- Synchronize Audio and Video: If you’re adding new footage, ensure that the audio and video are in sync. You can adjust the audio tracks in the timeline.
- Preview and Adjust: Watch your edited video. Make further adjustments if needed to ensure the green screen effect looks natural and seamless.
- Export Your Video: Once satisfied with the edit, export your video. Choose the desired resolution and format, and then save it to your device or share it directly from Capcut.
Preparing Your Green Screen Setup
- Choose the Right Material: Select a green screen made of non-reflective, wrinkle-free fabric. Wrinkles can cause shadows and uneven keying. If you’re on a budget, a plain, bright green poster or cloth can suffice.
- Even Lighting: Ensure your green screen is evenly lit. This minimizes shadows and provides a consistent color, which is crucial for effective chroma keying. Use soft lighting from multiple angles to avoid harsh shadows.
- Sufficient Distance: Place your subject a few feet away from the green screen. This distance helps prevent ‘spill’, where the green color reflects onto the subject, especially around the edges.
- Avoid Green Clothing: Ensure that the subject doesn’t wear anything green or in a color close to the green screen. Such clothing will become transparent after applying the chroma key effect.
- Camera Settings: Use a high-quality camera and set it to a high resolution. This helps in capturing the details and colors accurately, making the keying process more effective.
- Stable Setup: Secure your green screen firmly. Any movement can complicate the keying process. Using stands or a wall-mount can provide stability.
- Test Shots: Before recording the final video, take test shots to check the lighting and how well the green screen is working. Adjust as necessary to avoid post-production issues.
Importing and Editing Green Screen Footage in Capcut
Importing your green screen footage into Capcut is the first step in the creative process of editing. To begin, launch Capcut and select the option to start a new project. In the project interface, you’ll find the option to import media. Here, you can select the green screen footage that you’ve previously recorded. This could be footage of yourself, an object, or any subject filmed against your green screen setup. It’s essential to ensure that the footage is clear, well-lit, and free from shadows for the best results.
Once your footage is imported, the editing phase begins. Capcut offers a user-friendly interface, making it straightforward to navigate through various editing tools. The key feature for green screen editing is the ‘Chroma Key’ tool, located in the ‘Effects’ section. When you apply Chroma Key to your green screen footage, Capcut automatically detects the green color and makes it transparent. This is where the magic happens, as the green background starts to disappear, leaving only your subject in the frame.
After applying the Chroma Key, it’s time to refine your edit. Capcut provides options to adjust the intensity and edges of the effect, allowing you to fine-tune how the subject blends with the new background. This step is crucial, as it can make the difference between a seamlessly integrated subject and one that appears out of place. Experiment with the settings to achieve a natural and cohesive look.
The final step in the process is to add your desired background. With the original green background now transparent, you can overlay your subject onto any background of your choosing. This could be another video clip, a static image, or even an animated background. The choice is yours, and Capcut offers a range of options to explore. Once your new background is in place, play back your edited footage to ensure everything looks harmonious and adjust as necessary.
Advanced Tips and Tricks for Capcut Green Screen
Diving deeper into Capcut’s green screen feature, there are several advanced techniques and creative ideas that can help you elevate your video projects. One key aspect is layering multiple green screen clips. Capcut allows you to overlay several layers of video, enabling you to create complex scenes or effects. For instance, you could combine different green screen shots to create a scene with multiple characters or elements that were not originally filmed together.
Another advanced technique involves playing with light and shadow in your green screen footage. By strategically placing lights and creating shadows, you can add depth and realism to your scenes. This can be particularly effective when trying to blend your subject into a new background realistically. For example, if your background has a light source coming from the right, you would want to mimic this lighting when filming your green screen footage to ensure consistent lighting in the final edit.
Animation and motion graphics are other areas where the green screen feature in Capcut can be creatively used. By using green screen footage, you can integrate animated elements or special effects that interact with your subject. This approach can be particularly appealing for creating dynamic, engaging content, such as music videos or social media posts.
Finally, consider experimenting with different colors for the chroma key process. While green is the standard color used, Capcut’s chroma key tool is versatile enough to work with other colors. This can be useful in situations where your subject needs to wear green, or you’re working with props that are green. In such cases, using a blue screen or another color can provide the same effect without the limitations of a green screen.
Common Challenges and Solutions
Issue: Uneven Green Screen Lighting
- Solution: Use multiple light sources to evenly light your green screen. Avoid direct lighting to prevent harsh shadows. Soft, diffused lighting works best to achieve a uniform green background.
Issue: Green Spill on Subject
- Solution: Ensure there’s enough distance between your subject and the green screen to minimize green reflections. Use backlighting on your subject to help separate them from the background.
Issue: Chroma Key Not Detecting Green Screen Accurately
- Solution: Check for wrinkles or shadows on your green screen. Ensure that the green hue is consistent throughout. In Capcut, adjust the chroma key settings like intensity and threshold to improve detection.
Issue: Subject Edges Appear Rough or Pixelated
- Solution: This is often a result of low-quality video footage. Use a higher resolution camera if possible. In Capcut, fine-tune the edge smoothing and feather settings in the chroma key tool.
Issue: Difficulty in Synchronizing Audio and Video
- Solution: Carefully align audio tracks with your video clips on the timeline. Use Capcut’s audio waveform as a guide to match audio peaks with specific video frames.
Conclusion: Unleashing Creativity with Capcut’s Green Screen
The green screen feature in Capcut is more than just a tool; it’s a gateway to unbridled creativity and endless possibilities in video editing. Whether you’re crafting content for social media, making short films, or simply exploring the realms of digital creativity, the power of green screen technology in your hands is immense. Experiment with different backgrounds, play with lighting, and try out various effects to discover what works best for your vision. Remember, every great video starts with an idea, and with Capcut’s green screen feature, you have the freedom to bring those ideas to life in ways that were once only possible in professional studios. Embrace this technology, let your imagination run wild, and watch as your video editing skills soar to new heights.