mcpro24fps
Demo version of the mcpro24fps manual video camera. Try and buy a full version!
Chantal Pro SIA
6 B
043-demo
August 8, 2025
Android 7+
Desripción
Contents
- 1 mcpro24fps APK: Pro Manual Video Camera for Android
- 2 What Is mcpro24fps APK?
- 3 Core Capabilities at a Glance
- 3.1 10-Bit, HDR10/HLG, and LOG Profiles
- 3.2 On-Screen LUT Preview & Technical LUTs
- 3.3 HEVC/H.264 with High Bitrate, CFR/VBR, GOP
- 3.4 Scopes: Waveform, False-Color, Zebra, Peaking
- 3.5 Stabilization & Lens De-Warping
- 3.6 Kelvin White Balance & Presets
- 3.7 Audio Controls: External/Bluetooth Mics, WAV/AAC
- 3.8 Programmable Focus & Zoom Ramps
- 3.9 Dropped-Frame Counter & Performance Indicators
- 3.10 GPU Toggle & Tone-Mapping Modes
- 3.11 Anti-Flicker Shutter for 50/60 Hz Lighting
- 3.12 On-Device Storage & File Naming
- 4 Quick Start in 3 Steps
- 5 Device Compatibility & Requirements
- 6 Permissions, Safety & Installation Notes
mcpro24fps APK: Pro Manual Video Camera for Android
mcpro24fps APK puts pro-style manual video controls on your Android phone so you can capture grade-ready footage without a complex workflow. You get 10-bit/HDR options, LOG profiles, on-screen LUT preview, exposure and focus scopes, plus flexible bitrate/codec settings. The result: a practical way to keep your look consistent across projects—whether you’re filming short-form content, a travel montage, or an indie piece.
What Is mcpro24fps APK?
SAPO: Think of mcpro24fps APK as a reliable manual video camera app for Android. You set the rules—shutter, ISO, white balance by Kelvin, codecs and bitrates—while the app helps you preview color with LUTs and monitor exposure with professional tools.
If you’re a creator who needs consistent color across clips, a marketer who wants footage that survives re-encoding, an indie filmmaker who prefers LOG for grading, or a traveler who values stability and efficient storage, this app fits. The goal is simple: keep capture predictable, keep color manageable, and keep your files organized so post feels fast and clean.
Core Capabilities at a Glance
SAPO: Below are the capabilities users reach for most. Availability can vary by device, so test on your phone before a critical shoot. If you build a few presets—daylight, indoor tungsten, mixed light—setup becomes quick and your look stays consistent.
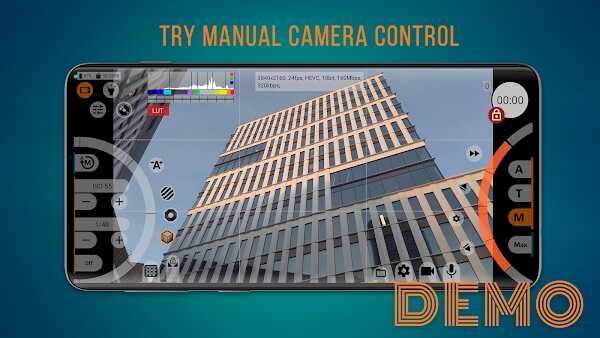
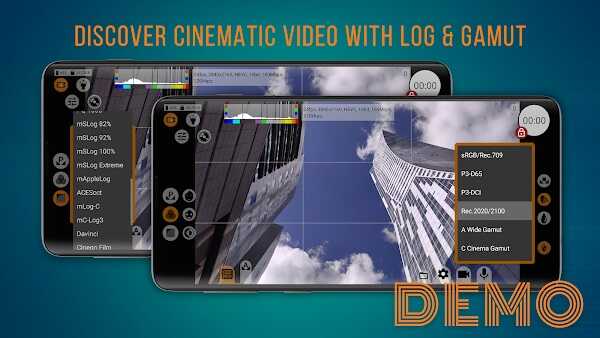
10-Bit, HDR10/HLG, and LOG Profiles
Record in 10-bit (where supported) to reduce banding and preserve gradients. LOG gives more headroom for color grading, while HDR10/HLG extends dynamic range for supported displays. Use LOG when you plan to grade; use standard profiles when turnaround is tight. A quick test clip under the actual lights confirms highlight and skin-tone placement.
On-Screen LUT Preview & Technical LUTs
Apply a monitoring LUT during capture to visualize a target look or normalize LOG for confidence. Technical LUTs make the pipeline repeatable: capture flat → preview with LUT → apply the technical transform and your creative look in post.
HEVC/H.264 with High Bitrate, CFR/VBR, GOP
Choose HEVC (H.265) or H.264 based on workflow and compatibility. Control bitrate to match scene detail, pick CFR/VBR as needed, and set GOP for motion clarity. High-quality source files mean cleaner edges and fewer artifacts after export.
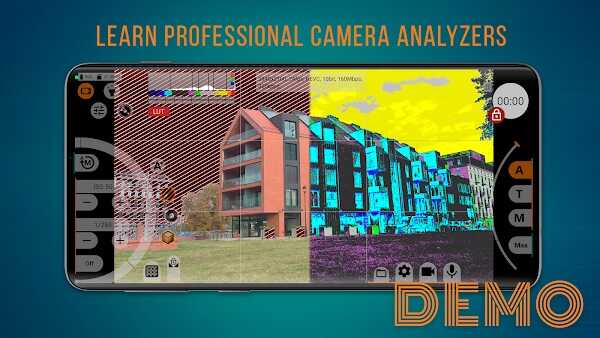
Scopes: Waveform, False-Color, Zebra, Peaking
Use waveform or false-color to expose consistently, zebras to protect highlights, and focus peaking to confirm sharpness. These tools reduce guesswork on set and save time in post.
Stabilization & Lens De-Warping
Leverage device-level stabilization where available. Use de-warping to correct wide-angle distortion so straight lines stay straight. The aim is a steady, natural frame without geometric distractions.
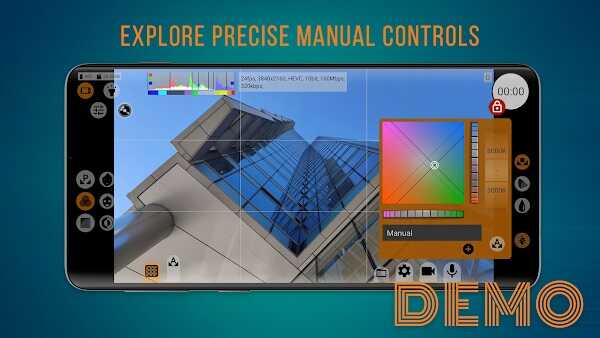
Kelvin White Balance & Presets
Set white balance in Kelvin and lock it so color doesn’t drift between shots (e.g., ~5600K daylight, ~3200K tungsten). Save reusable presets to speed up setup and keep color consistent across locations.
Audio Controls: External/Bluetooth Mics, WAV/AAC
Choose your audio source (external or Bluetooth mic), set sample rate/channels, and monitor levels. Save WAV for editing flexibility or AAC for compact delivery. Prioritize clean gain; avoid clipping.
Programmable Focus & Zoom Ramps
Design repeatable focus pulls and zoom ramps. Pre-programming motions gives you smooth transitions and keeps hands free for exposure or framing.
Dropped-Frame Counter & Performance Indicators
Watch capture stability in real time. If you see dropped frames, lower bitrate, disable heavy processing, or shorten takes to stay reliable.
GPU Toggle & Tone-Mapping Modes
Toggle GPU-assisted modes to balance image treatment and stability on your device. Tone-mapping options help shape highlight roll-off so the camera response matches your grading plan.
Anti-Flicker Shutter for 50/60 Hz Lighting
Under artificial lights, match shutter to mains frequency: 1/50 for 25 fps regions and 1/60 for 30 fps regions. A quick preview under the real fixtures confirms a clean result.
On-Device Storage & File Naming
Use fast, reliable storage and a clear file-naming scheme (project + date + shot). Test long takes to confirm sustained write speed and avoid interruptions.
Quick Start in 3 Steps
SAPO: New to manual control? This simple flow gets you consistent results fast. Save it as a preset so you can load it before every shoot.
-
Set FPS/Resolution & GPU Toggle.
Start at 24 fps with a shutter near 1/48 for natural motion. Choose 4K for detail or 1080p for lighter files. Test GPU and non-GPU modes on your device to see which is more stable. -
Expose with Scopes & Lock Kelvin WB.
Use false-color to place skin tones, waveform to fine-tune highlights/shadows, then lock white balance in Kelvin (e.g., 5600K outdoors) to prevent color shifts. -
Select Mic, Monitor Levels, Start Recording.
Pick an external or Bluetooth mic if needed, confirm levels, and record a short test to check sync and noise. Save a “Cinematic 24fps” preset, confirm anti-flicker shutter (1/50 or 1/60), and run a >30-second trial to validate storage speed.
Three quick checks before you roll:
-
Remaining storage covers the expected take length.
-
Your preset is loaded (no accidental changes).
-
Five seconds of recorded silence in headphones to catch hum/noise.
Device Compatibility & Requirements
SAPO: Camera stacks differ across Android devices, so some features depend on hardware and drivers. Plan to test your mcpro24fps APK setup before important shoots and keep thermal behavior in mind on longer takes.
-
10-bit/HDR/Stabilization: Availability varies by model and camera pipeline.
-
GPU features: Some modes require compatible OpenGL ES; non-GPU alternatives exist.
-
Bitrate & storage: High bitrates need fast, reliable storage; validate with a 30–60 s test.
-
Thermals: Long takes can raise device temperature; build short breaks into your workflow.
-
Continuity tips: If you change locations, re-check white balance and exposure so clips match.
Permissions, Safety & Installation Notes
SAPO: The app needs certain permissions to record video and store files. You can manage these anytime in your device settings. For reliability, install from trusted sources and test on your device before critical work.
-
Camera, Microphone, Storage: Required for recording and saving media.
-
Privacy & control: Files are saved locally; you decide where they live and how they’re backed up.
-
If permissions are denied: Re-enable them in Settings and relaunch the app.
-
Uninstall & data: Back up any footage you want to keep before uninstalling.
-
Shared devices: Agree on a simple folder structure so media is easy to find and archive
FaqS
mcpro24fps APK is an Android manual video camera app designed for creators who want pro controls and grade-ready footage. It offers 10-bit/HDR (HDR10/HLG), LOG profiles, on-screen LUT preview, scopes (waveform, false-color, zebra, peaking), bitrate control, and stabilization—ideal for vloggers, short-form marketers, indie filmmakers, and travelers.
Support in mcpro24fps APK depends on your phone’s camera stack (Camera2) and GPU capabilities. Many devices expose 10-bit, LOG, or HDR10/HLG; some do not. The best practice is to test on your device, then lock Kelvin white balance, enable scopes, and confirm stable recording before important shoots.
Start mcpro24fps APK at 24 fps with a shutter near 1/48 for natural motion, lock Kelvin WB (e.g., 5600K daylight), enable LUT preview, and expose with waveform/false-color. Choose HEVC/H.265 or H.264 with a suitable bitrate, save a “Cinematic 24fps” preset, and run a 30–60 s test to verify storage speed and stability.
mcpro24fps APK lets you pick HEVC/H.265 or H.264, set CFR/VBR and GOP for motion clarity, and adjust bitrate for detailed or fast-action scenes. For audio, choose WAV (editing flexibility) or AAC (smaller files), use external/Bluetooth mics, monitor levels, and avoid clipping for clean dialogue.
In mcpro24fps APK, match shutter to local mains: 1/50 at 25 fps regions or 1/60 at 30 fps regions to reduce flicker. Use fast, reliable storage, watch the dropped-frame counter, and—if needed—lower bitrate, adjust GOP/CFR, toggle GPU features, or shorten takes to maintain stable recording.
Images